This is the documentation for the [wildcard week](wildcard.html).
The main introduction is below.
For application-specific documentation, see the following pages:
* [DAT Format](dat.html)
* [Jacquard Knitting](jacquard.html)
* [Patterning](patterning.html)
* [Casting on/off](casting.html)
# Knitting Background
Content mainly following the glossary of [AutoKnit](https://textiles-lab.github.io/publications/2018-autoknit/) in their [supplementary](https://drive.google.com/open?id=18k5l1onqkkZkKkRsWLRynD6zPgmujDel) and the background section §3 of the great PhD thesis of [Underwood](https://researchbank.rmit.edu.au/view/rmit:6130).
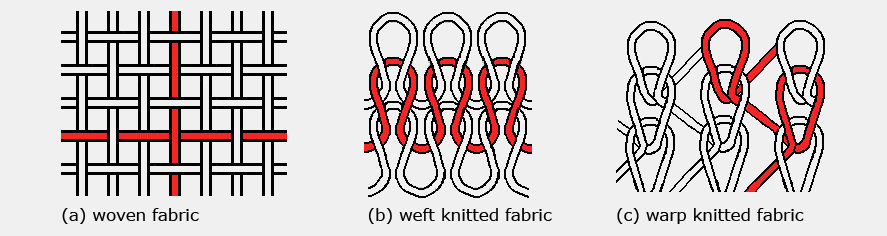
## Weaving vs Weft- vs Warp [knitting](https://en.wikipedia.org/wiki/Knitting#Weft_and_warp_knitting)
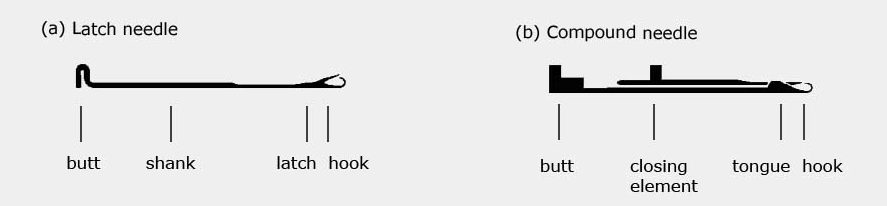
## Knitting Needle
Basically, what holds the yarn:
* for [hand knitting](https://en.wikipedia.org/wiki/Knitting_needle)
* for flat knitting: [latch needle](https://textilechapter.blogspot.com/2016/12/latch-needle-parts-function-types.html)
* for wholegarment knitting: *latch* vs *compound* needle (closing element)
* SWG091N2 uses compound needles (two components)
## Machine Components
### Needle Bed
**Bed** = aligned collection of needles
<img src="images/g_bed.svg" width="400">
**V-bed** = two opposite beds in an inverted V shape
<img src="images/g_vbed.svg" width="400">
<img src="images/img-009.png" width="800">
<br>
**X-bed** = four beds (two lower ones for knitting, two above for transfers)<br>
Typically, knitting cannot be done when the corresponding transfer bed is in use (similarly to V-bed with sliders).
<img src="images/img-011.png" width="600">
### Racking
Denotes the ability of the bed to change their needle offset (by 1/4, 1/2 or integer pitches).
SWG091N2 can use up to 7 pitch racking.
<img src="images/img-012.png" width="800">
### Carriage and Cams
This is what triggers the individual needle operations (together with the electronic selection using solenoids).
Lowering the cam allows for control of the stitch length (giving more or less yarn travel => looser or tighter stitches). You can program the **stitch number**, which corresponds to this lowering of the cam, per carrier pass.
<img src="images/img-013.png" width="800">
<img src="images/IMG_20181206_210003.jpg" width="600">
### Yarn Carriers
These hold (and carry) the yarn over the bed.
They can be controlled independently from the main carrier, although they typically move together with it (ahead or behind).
Our machine can use up to 10 carriers at the same time.
Care must be taken to ensure the carrier do not conflict with the needles (i.e. a carrier cannot be somewhere where a needle is triggered).
<img src="images/IMG_20181206_210019.jpg" height="400">
<img src="images/IMG_20181206_210026.jpg" height="400">
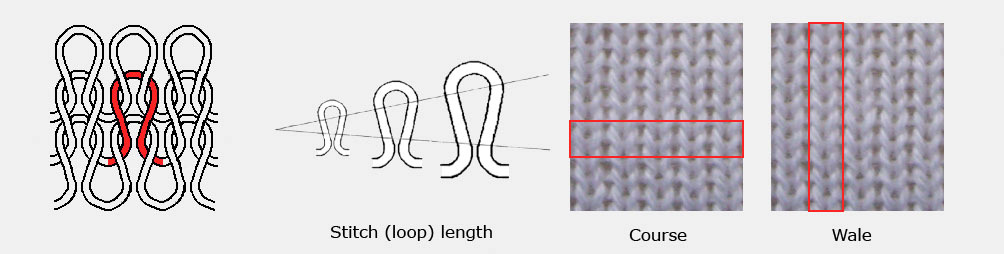
## Basic Weft Knit Structure
* Course = "row" of knitting (following the thread)
* Wale = "column" of knitting (following the loop connections)
## Basic Knitting Operations
### Tuck
This operation adds a new loop of yarn in the needle hook without pulling through the current ones.
Thus, the existing loops stay in the hook with the new one.
**Instructions**:
* `11` (front tuck)
* `12` (back tuck)
<img src="images/g_tuck_1.svg" height="300">
<img src="images/g_tuck_2.svg" height="300">
<img src="images/g_tuck_3.svg" height="300">
<img src="images/g_tuck_4.svg" height="300">
<img src="images/g_tuck_5.svg" height="300">
<img src="images/g_tuck_6.svg" height="300">
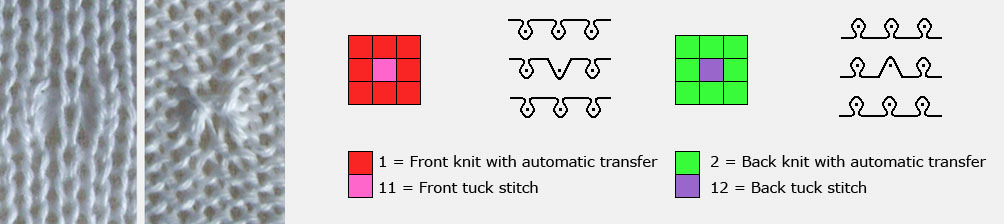
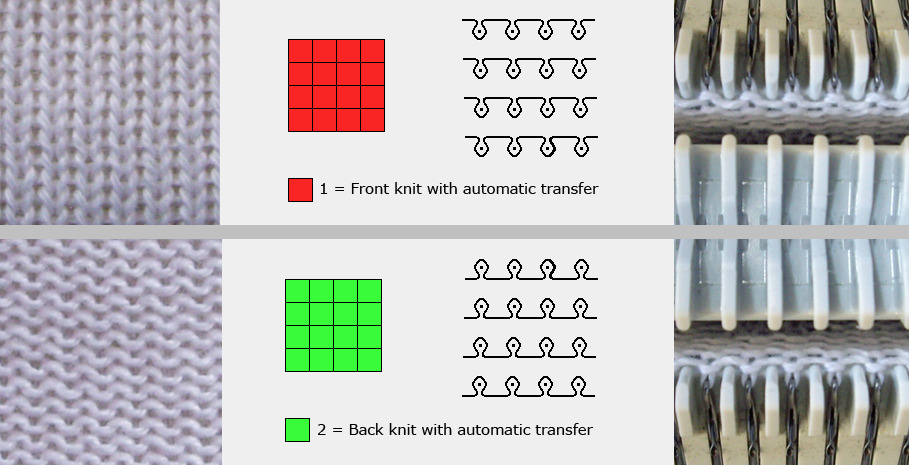
### Knit
This operation creates a loop through all existing loop of a needle, then dropping these previous loops while holding the newly formed loop.
Depending on which bed this is done on the appearance of the corresponding stitch varies a lot.
Back stitches are commonly known as *purl* or *reverse* stitches.
**Instructions**:
* `1` (front knit w/ automatic transfer)
* `2` (back knit w/ automatic transfer)
* `51` (front knit w/o automatic transfer)
* `52` (back knit w/o automatic transfer)
An important instruction detail is **automatic transfer**.
Shima Seiki's instructions are modal w.r.t. the alternating beds: by default, they trigger transfer operations if the needle on the other bed has one (or multiple) loops.
Instructions `1` and `2` allow to easily create alternating patterns that transfer stitches between front and back beds. However, if your intention is to create a tubular structure using the two beds, you have to either
* explicitly prevent transfers: option `R9=1` for link process ignore
* specify the transfer behaviour: option `L13=51/52/81/82/...` for automatic transfers
* or use instructions `51` or `52`
<img src="images/g_knit_1.svg" height="300">
<img src="images/g_knit_2.svg" height="300">
<img src="images/g_knit_3.svg" height="300">
<img src="images/g_knit_4.svg" height="300">
<img src="images/g_knit_5.svg" height="300">
<img src="images/g_knit_6.svg" height="300">
### Transfer
This operation transfers the loops in the needle to the needle (or the slider) on the opposite bed.
This allows moving stitches between bed. Together with racking (offsetting between needles), it allows moving stitches along the beds.
**Instructions**:
<ul>
<li>"transfer" (to other bed, with potential offset, but numbering is a mess):
<ul>
<li>front-to-back: `2x`, `4x` and `68`
<li>back-to-front: `3x`, `5x` and `69`
</ul>
<li>"move" (along the current bed, with easy numbering):
<li>front-to-left: `6=61` or `6N` for N pitches
<li>front-to-right: `7=71` or `7N` for N pitches
<li>back-to-left: `8=81` or `8N` for N pitches
<li>back-to-right: `9=91` or `9N` for N pitches
</ul>
An important detail is that these instructions all assume you are actually knitting once and then do the transfer, which allows writing continuous patterns.
To prevent the knitting from happening, you must use option `R5=1` (knit cancel).
<img src="images/g_transfer_1.svg" width="150">
<img src="images/g_transfer_2.svg" width="150">
<img src="images/g_transfer_3.svg" width="150">
<img src="images/g_transfer_4.svg" width="150">
<img src="images/g_transfer_5.svg" width="150">

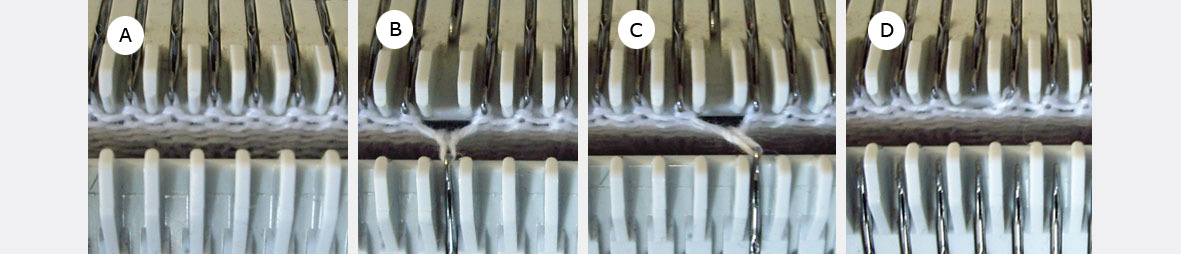
When moving left or right, the machine does a bed-to-bed transfer first (a-b), then racks by the desired pitch (b-c), and finally transfer back to the initial bed (c-d).
If you need to move along your bed without merging with the loops on the opposite bed, you can either
- use half-gauge knitting (have a loop only on every other needles - odd on front, even on back), so the opposite needle is always empty, or
- transfer loops over the **slider** element of the opposite needle (instead of the hook, by default), using option `L13=51/52`
<img src="images/g_half_gauge.svg" width="400">
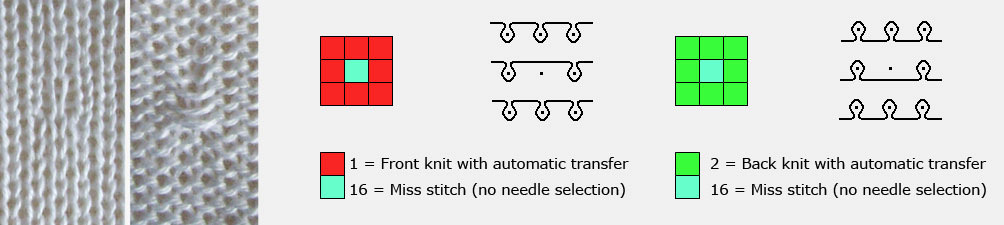
### Miss (or Float)
This operation does not catch yarn. If used as-is within a group of stitches, it is similar to no instruction. If used on the border of the instructions (where no other instructions are), then it forces the yarn carrier to eventually move that far (although the yarn carrier start/end positions can be specified with instruction `13`.
**Instructions**:
- `0` = miss (a line cannot have only that instruction)
- `16` = no needle selection (but implies the carrier goes over the needle)
- `116` (front miss), `117` (back miss)
The front/back misses are variants that trigger the automatic transfer (link process).
This allows selecting on which side of the yarn the "floating" yarn should be by automatically moving the current stitches to be on the selected opposite side.
## Wholegarment Knitting
By alternating between the two beds, we can knit tubular structures.
The term for Shima Seiki is "Wholegarment".
To create full garments, you however need to do "shaping", i.e. modify the local curvature and stress of the yarn to allow the yarn directions to change.
This is achieved with a set of simple operations: *short rows*, *increases* and *decreases*.
### Short Rows
Short rows are created by knitting over a section of the available needles, which allows some wales to be augmented without changing others.
This is notably what is done to create the heel of your sock.
**Beware**: the tension at the boundary tends to make the yarn accumulate and raise on the bed, which can lead to failed stitches. To better control short rows, it is advised to use the *presser plate* (option `R11=101`) which automatically pushes on the yarn to enforce that it is down (or ensure there is tension below using sub-rollers, or the yarn's weight).
<img src="images/g_shortrows.svg" width="300">
### Increase
Increase shaping introduces new wales, which increases the fabric width.
The additional space for the loop is introduced by moving groups of stitches (left or right), and tucking the empty needles (or splitting previous existing loops).
**Notable instructions**:
* `17` (front knit with kickback process)
* `18` (back knit with kickback process)
* `101` (front split knit)
* `102` (back split knit)
<img src="images/g_increase.svg" width="300">
**Kickback** subdivides the yarn sequence so that the knit operation is done in the opposite direction, which ensures that empty needles can be cast on directly (by having an opposite yarn direction), else the stitch doesn't happen directly and creates a hole in the knitted structure.
**Split Stitches** pass the loop through, but have the remaining loops (that went through) transferred to the other side (and then typically moved to the left or right of the new stitch). This prevents the creation of holes when increasing the width.
It is the complementary operation to decrease shaping but is more complicated to use as it has a few restrictions. Notably, it cannot appear on a line with other operations (and thus involves splitting the yarn sequence).
<img src="images/split1.png" height="250">
<img src="images/split2.png" height="250">
<img src="images/split3.png" height="250">
<img src="images/split4.png" height="250">
<img src="images/split5.png" height="250">
<img src="images/split6.png" height="250">
Hole (tuck, even worse than kickback) vs no hole (split stitch):
<img src="images/tuck_increase.png" height="250">
<img src="images/split_increase.png" height="250">
### Decrease
Decrease shaping remove wales, which decreases the fabric width.
The operation is much simpler as it only consists of moving groups of stitches (overlapping stitches where they meet, which then gets bound together by the next stitch).
**Beware**: the stacked stitches will need to be knit. Our machine can only safely knit through 2 loops. 3 loops are possible but can fail depending on the tension. Beyond that number (>3), the knit operation is likely to fail (although it is allowed by the machine).
<img src="images/g_decrease.svg" width="300">
# Instruction Reference
<img src="images/help_instructions.png" height="400">
<img src="images/options.png" height="200">
Help from KnitPaint:
* [All instructions](images/help1.pdf), similar to above
* [All side options](images/help2.pdf)
## Notable options
Options are typically prefixed by their side `Rn` being right option `n` where `n` goes from 1 to 20.
On the **R**ight side, the main options are:
* `R1` - the *jump economizer* specifying a repetition section (i.e. its number, which is specified at compilation and/or on the machine)
* `R3` - the *yarn carrier* to be used for the line (i.e. a number, which gets mapped to a yarn carrier during compilation, but defaults to what you choose as a number)
* `R3=255` for no yarn (knitting with no yarn removes the loops from the needles)
* `R5=1` - knit cancel (useful for move / transfer instructions)
* `R6` - the stitch number (tension), which is mapped on the machine to an actual number, typically:
* Tight beginning = 33, 37
* Default course = 5
* Tight ending = 50
* `R7=11` enables the drop failure detection (mandatory) at the end of the program (typically a few line before casting off the needles)
* `R9=1` for links process ignore (no automatic transfers on this line
* `R10` is to specify a pattern on the yarn holding hook (when introducing yarn, and when removing yarn)
* `R11=101` is to use the fabric presser (e.g. for short rows)
* `R15` is to use the yarn inserting unit (introduce yarn, release yarn, and cut yarn)
On the **L**eft side, the options are typically less important for beginners: speed, elastic yarn, racking, parameter adjustment, A miss (for inlay), sub rollers.
The main option of interest for you will be
* `L13` which specifies how to do transfers (and also how to hold things on sliders)
* `L13=0` is the default transfer (hook to hook)
* `L13=1` is a special transfer to slider (from hook to slider), which you won't need
* `L13=51` assumes you are knitting on the front bed, and moves require sliders (on the back bed)
* `L13=52` is the same as `51` but for the back bed (using the front bed sliders)
* `L13=81` enforces we start on the front bed, and end on the front bed (for patterning on half-gauge tubular structures), e.g. for ribs
* `L13=82` is the same as `81` but for the back bed
# Miscellaneous Resources
[Accessibility](http://accessibility.mit.edu/) @ [MIT](http://web.mit.edu) [CSAIL](http://csail.mit.edu)